


Hour 11: The Basics of Attacking: Damage Part II
Hello everyone, it's the skill smith and your SF Seminar lecturer, Mr. Bug here.
We're going to pick up where we left off last time, and talk about the damage reactions that are attached to attacks.
Damage Reactions
In addition to damage values and parameters which we talked about the last time, audio/visual information like the opponent's motion and sounds are also attached to hitboxes. It's those reactions I'd like to address. There aren't a whole lot of fighting game terms to learn, so this should be pretty straightforward.
The primary reactions that are attached to hitboxes are as follows.
①...Hit/block effects
②...Hit/block sounds
③...Opponent motions on hit/block that change accordingly
The reactions for ① and ② will become more intense as the attack strength increases.
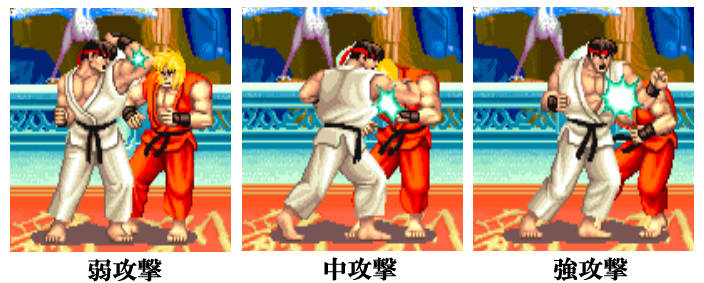 [Image Text: Light Attack / Medium Attack / Hard Attack]
The reaction gets bigger according to the attack strength.
As the effects and sounds don't really have any effect on the battle itself, we'll stop here. Next I'd like to talk about the third aspect, opponent damage motions, which do have a direct influence on the battle itself.
Damage Motions
As we looked at in Hour 8 there are various states your character can be in. When an attack connects, it also contains information on the damage motion which affects the opponent's state.
Damage motions have a very big effect on the battle, so I'd like to explain things in-depth here.
Pushback: Hit/Block
Upon contact, an attack will push the opponent back. The general concept is called "pushback" - you may sometimes hear "hit back" or "block back" to differentiate, but I think the common phrasing is often "pushback on hit/block."
 The opponent is pushed back upon attack contact.
The pushback distance increases together with the strength of the attack. However many games lately use independent, detailed settings for even normal attacks, so fundamentally you can think that every attack has its own unique pushback distance.
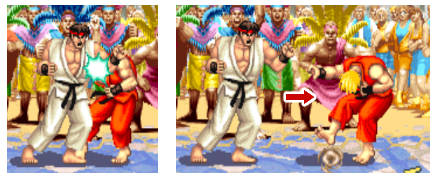
Though pushback is usually applied to the opponent, if they happen to be in the corner, then the pushback will be applied to the attacker.
 [Image Text: Center of the screen
In the corner]
The amount of pushback normally applied to the recipient will be applied to the attacker. Note Ryu's position relative to the background.
As an exception, projectiles such as the Hadoken will cause no pushback in the corner. This is pretty important, so be sure to remember it.
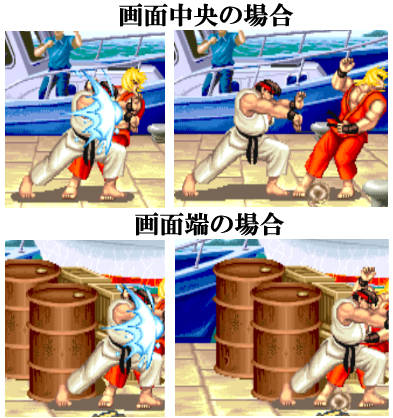 [Image Text: Center of the screen
In the corner]
Projectiles cause no pushback in the corner. Depending on the move, this could be good or bad.
Hit Stun & Block Stun
Upon being hit by an attack, the character will go into a "staggered" damage state. As we discussed in a previous lecture, they will be unable to move in this state. The duration of this state depends on the attack used.
The amount of time that a character cannot move after an attack (being staggered) is called "hit stun."
The amount of time that a character cannot move after blocking an attack is called "block stun."
As was previously discussed, as an attack gets stronger, it also becomes heavier and more difficult to use. Those are the basics, so attacks must also deal increasing amounts of hit stun as well. Otherwise using them would put you at a disadvantage.
Similar to pushback, you should think of each attack having its own unique hit/block stun attributes.
Hit Stop/Block Stop
If an attack connects, separate from hit/block stun, you may notice that both character pause for a brief moment.
This is easiest to understand if you look at it in game, but watch a move whiff. It may move so fast that you can barely see it. Now have the attack connect - you'll be able to see it a little better, especially upon contact with the other character.
This is something called "hit stop/block stop," that helps to give the player a sense of the attack hitting as well as the weight of the attack.
Hit/block stop is for the visual performance of the game, so unlike pushback and hit/block stun, the amount of hit/block stop is usually systematic per game. For example, one game might have it so that light/medium/heavy attacks cause 8F/12F/16F of hit/block stop respectively. In order to keep the feeling of control and the game tempo consistent, there aren't a whole lot of variations between moves, but for a move that hits multiple times, the hit/block stop may be shortened to prevent it from feeling too heavy. This is all just for the visual performance of the game.
Additionally, similar to pushback, projectile attacks do not cause any hit/block stop for the attacker. In regards to pushback and hit/block stop, an easy way to think of it is that for projectiles don't have any physical effects for the character throwing it.
Basic Concept of Advantage/Disadvantage
When an attack hits there are two things going on at once - the attackers' motion, and the hit stun of the character that got attacked. As these things overlap, there will be a gap between when both characters are able to move again.
The gap between which one character can move while the other still cannot is called "advantage". It is also called "disadvantage" depending on the point of view.
Let's take a look at an example visually, using the knowledge we've learned so far.
 [Image Text: Attacker: Progress of Time
Startup: 3 / Active: 4 / Recovery: 5
Recipient: Progress of Time
Hit Stun: 13
Progress of Time Upon Successful Hit
Hit Stop: 8
Active : 4 / Recovery: 5
Hit Stun: 13]
While there is startup for the attacker, the startup does not have a hitbox and therefore does not affect the passage of time for the recipient.
When the attack hits, both sides will experience hit stop. In this example, we're using 8 frames of hit stop.
After the hit stop ends, for the attacker they will finish their remaining active frames, and then go into the recovery frames. For the recipient, they will go into their hit stun recovery.
You may be thinking "why are you calculating the remaining active frames for the attacker?" That's a good question, and I'd like to cover it in another lecture.
As you can see in the above image, the attacker will be able to move again after 9 frames, while the recipient will need a total of 13 frames. That leaves a gap where the attacker can move again 4 frames before the recipient can. This is illustrated by the ① on the image.
This is the advantage, and we say that the attacker is "at a 4F advantage on hit." Conversely from the POV of the recipient, we can say that they are "at a 4F disadvantage upon getting hit."1
Note: upon the attack landing, the first active frame has already actually passed. The remaining time is calculated from the second active frame, but for the ease of explanation I included the first frame this time around.
1: In most cases "disadvantage" isn't used to talk about what happens upon hit, but it does become important when discussing the gap on block. If blocking a move leaves you at a disadvantage, it means that your opponent will recover before you do. This is important in determining what your next move will be, but that's going more in-depth into battle strategy.
Successfully landing an attack doesn't always leave you at advantage. The recovery values are different for each move. They're also different on hit or block, and in some games, they can also differ depending on whether the character receiving the attack is standing or crouching. Advantage and disadvantage are aspects that are completely different for each game, and for each move.
Review
As we primarily covered the elements that are a part of damage reactions, there isn't really anything to review here. It's a bit detailed and perhaps a little troublesome, but this is something I'd like you to really read and think about.
We touched on the concept of recovery and advantage/disadvantage in this lecture, but this is something that's extremely important as it relates to all that goes on during a battle. As such, I'd really like to go in-depth about advantage/disadvantage in the next lecture.
See you again soon!

Writer

 PlayStation および