


Hour 10: The Basics of Attacking: Damage Part I
Hello everyone, it's the skill smith, Mr. Bug checking in.
For the second entry in the basics of attacking, I'd like to talk about something that's closely tied together with attacks - damage.
Things Connected to Attack Hitboxes
There are two things that are connected to attack hitboxes.
①Damage parameter, for how much damage will be dealt to the opponent
②The opponent's reaction and effects
Much will depend on the opponent's state and the game engine itself, but for now I'd like to cover the basics, with a bit of supplementary info sprinkled in along the way.
Though there are cases where the settings for these conditions are fixed across broad general categories (such as uniform light attacks), for the most part, you can think of each attack hitbox having its own separate settings. If, when you're looking things up, you start to think things like "Well, this should be the same as that..." and don't bother to confirm it, you may find yourself surprised when it comes to the actual use in a battle. Though there are some familiar concepts from time to time, don't go thinking that anything is a constant.
Parameters: Damage
Each attack will have a damage parameter, or just damage, of how much vitality it takes away from the enemy. It probably goes without saying, but the stronger the damage parameter, the stronger the attack.
For normal attacks, the damage dealt goes up in accordance with the strength of the attack. In accordance, the attack itself becomes heavier to perform. This is how the differences in attack strengths are created.
So then you may be thinking that unique moves and special moves, being more sophisticated than normal moves, will deal more damage. However that's not necessarily true - there are countless variations in the damage parameters of unique and special moves. Unique moves are more or less in the same category as normal moves, and if you don't use the special move proficiently it can do as little damage as a light attack.
The reason why is the same as for normal moves - special moves that are light and easy to use do less damage, while those that are heavy and difficult to hit will do more damage. Well then, what's so special about it? You may be wondering. Special is, of course, all in the name.
Off-Topic: OP Special Moves
Learning the Lingo note: "OP" stands for "over-powered" and is often used in fighting game lingo to talk about something that is, well, over-powered, or considered to be way too strong.
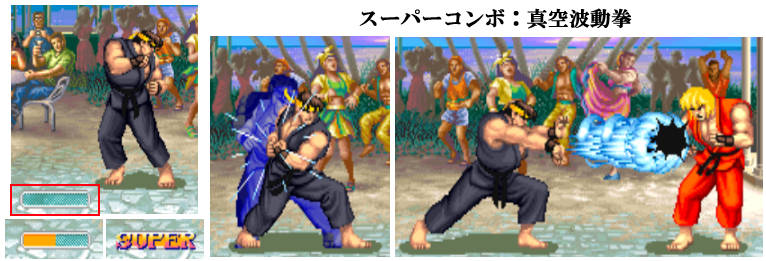
For the three special moves in the first Street Fighter - Hadoken, Tatsumaki Senpyukyaku, and Shoryuken, just hitting one of these could reduce your opponent's vitality by 40%. That's crazy, right? Against the boss Sagat, if you hit him with the Shoryuken just right, it'd connect 3 times, and this move alone would be enough to defeat him. Talk about special!
 I couldn't get a picture of the first hit, but check out hits 2 and 3.
...Yep. That'll put a scar on your chest.
As fighting against human opponents became the main draw of fighting games, special moves that dealt this kind of insane damage were taken out. In their place eventually a new system was made that allowed for a new kind of big special move that required a unique gauge to utilize.
Stun State
I'd like to talk about the stun parameter next, but before that I'd like to talk about the stun state.
In the Street Fighter series, if you get hit with too many attacks in a short amount of time, you'll enter into what's called the stun state. You can call it just "stun", but probably the most common name for it is "dizzy."
 Ken gets up dizzied after being knocked down.
You are completely unable to move while dizzied. It's a huge opportunity for the opposing player.
Considering you had to take a considerable amount of damage to get dizzied, and now you're defenseless, you can think of being dizzied as a fatal blow.
You can shorten the time you're dizzied by mashing (see below), but you will most certainly be vulnerable upon wakeup. It's not necessarily an exercise in futility - there have been plenty of cases where the opposing player couldn't attack fast enough, and the dizzied player was able to recover.
Rapidly shaking the stick and pressing as many buttons as rapidly as you can is called "mashing". The term mashing comes from rapidly slamming on the buttons, but the term can include shaking the stick as well.
To better explain the dizzy system - in addition to the vitality gauge, each character has a stun gauge (sometimes called a "dizzy gauge"). I will explain stun parameters shortly, but basically if a characters' stun value exceeds their gauge, then they'll become dizzied.
The stun gauge will gradually decrease over time. If you've been hit with a lot of attacks in a short amount of time, you're going to have to start evading attacks and buying time for your stun meter to decrease.
Parameters: Stun
In order to create the stun state I talked about above, attacks need to have a "stun parameter" attached to them. The common terminology for this is "stun value."
Just like damage, stronger attacks deal out more stun. And just like other unique and special attacks, those parameters can vary greatly.
While the aspects of damage and stun are very similar, attacks that deal high damage don't necessarily deal out high amounts of stun. As a part of each attack's functionality, there are moves that don't deal a lot of damage, but do deal high amounts of stun.
Parameters: Increasing Gauge
Depending on the game, there may be moves that use up some type of gauge. For SFII, the "Super Combo" gauge was introduced in Super SFII.
 Once the gauge at the bottom of the screen fills up, you can perform a hard-hitting move.
If landing attacks is one of the conditions for filling up the gauge, then your attacks will also have a parameter for how much gauge will be given upon attack.
A Bit of History
Getting Stunned/Dizzied
As I mentioned before, putting your opponent in a dizzy state is a huge opportunity, and can possibly be the finishing blow in the round. In many games, maneuvering around the dizzy - both putting your opponent into dizzy, and trying to stay out of it - become a big part of the overall strategy.
But it wasn't always this way!
Back when SFII was in the arcades, there were some players who considered hitting an opponent during dizzy to somehow be dishonorable. They'd wait and let you recover, and if they accidentally hit you during dizzy, they'd let you hit them with an equivalent attack to even things out.
You don't really see that kind of thing anymore these days, but it goes to show that everyone has a different approach to fighting games. Personally, I say if it's in the game, use it!
Review
Let's review what we've covered so far.
①There are various parameters attached to an attack hitbox, not just the one for dealing damage.
②Every attack has its own parameters.
③You're in trouble if you get stunned/dizzied.
And that's it. ...You really don't want to get dizzied.
Next time, we'll cover the damage reactions in part 2 of this lecture on damage.
See you again soon!
Writer
 PlayStation and